
Here’s a short quiz for anyone who uses their hands at a keyboard regularly. Be it the musical kind or one attached to a monitor, how you move has a big influence on your physical health over the long term. These basic concepts are a great way to start taking better care of your hands!
As a musician who has worked through repetitive strain injury, I’ve learned the hard way about how our bodies can be damaged through improper motion. On my piano blog, I’ve already written about 3 techniques which have helped me recover, namely Body Mapping, Alexander Technique, and Biofeedback. Today I’m going to pass on a few ideas from the one technique which has helped me the most: The Dorothy Taubman Method.
I will get into more details about the method and Ms. Taubman’s process of developing it another day, but I must give credit where it is due. I’m lucky to be able to work with a certified Taubman teacher to this day. The invaluable and extremely logical methods are something that I pass on to my own students as well. If you want to find out more about this method and who teaches it the best place to start is at the Golandsky Institute in New York.
Anyways, let’s get to your quiz!
Below are a series of pictures organized in pairs. All you need to do is decide which one demonstrates a healthier, more comfortable movement or position. There are only four questions. We’ll then discuss each question afterwards. Good luck! You may discover you have some habits that need reviewing.
Question 1: Which arm/wrist alignment looks more natural?

Question 2: Which wrist height is more stable?

Question 3: Which image shows more tension in the hand?

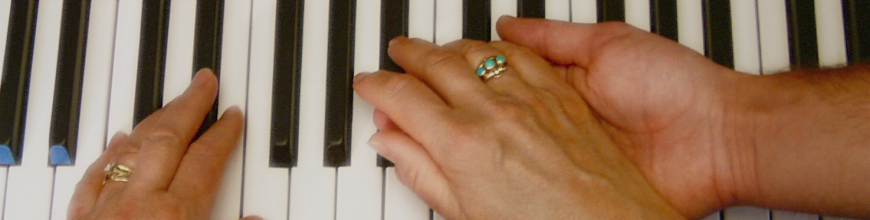
Question 4: While one finger presses a key, what’s better for the other fingers to do?

♪♫
Well, how did that go? Was it easy? Let’s go over this together.
So, in question 1 B) is the more natural position. Why does this matter? Well in A) what we are seeing is ‘twisting’. The fancy term is ulnar deviation; when the hand moves towards the ulna, the fixed bone in your arm on the outside. This happens usually because the thumb is shorter than the other fingers, so for it to play it needs to twist in towards the keyboard. The false concept that the fingers must also be parallel with the keys at all times is also a reason for this twisting. When playing directly in front of the body it’s easy to twist like this. The result is an awkward position. All the tendons and nerves which run through the carpal tunnel are now moving at a strained angle.
The solution is to maintain a parallel relationship between the hand and arm as seen in B). This allows the tendons to move much more easily and it also enables the fingers to be equally strong because the arm is behind each one of them. You’ll also notice the fingers are NOT parallel with the keys. It may affect the fingering you choose to use, but preserving this alignment is essential for healthy playing and typing. Next time you sit down at any keyboard, check your alignment and see if you notice yourself twisting.
♪♫
In question 2, which wrist height is more stable? While many pianists who are fantastic players may play with lower wrists and be fine, what I’ve learned is that wrist height shouldn’t be too heigh or too low, but in what I like to call the ‘Goldilocks Zone’. In slide A) we see a wrist that is in its most neutral position. You can find it by simply having your arms and hands dangle at your sides. Then bend your elbow and put your hands on a keyboard/table and try to preserve the same alignment that you found when they were dangling. This position creates an arch all the way from the elbow to finger tips which allows weight to be effectively transferred to the keys. In the lowered wrist, as in B), weight goes directly to the wrist and is not transferred effectively to the keyboard. Arches are stable structures wherever we find them!
♪♫
In question 3, the image showing more tension is A). What I want you to see is that if you open the hand on its own as seen in the first image (this is called ‘abduction’) then you not only create tension in the arm, but you make it harder for the fingers to move fluidly. Simply open up your hand as seen in the picture and try to move your fingers quickly. Probably not too easy. Then allow your fingers to come back together in a neutral position and move your them again. You should notice that when the fingers are together they move more easily. In B) it may appear that the hand is also tense because it is open and playing a full chord. However, the keyboard is actually doing all the work. As you fall into a chord you can allow the spread of the keys to open your hand. This way it doesn’t take any energy to open the fingers and they’re more released.
♪♫
In question 4 the question was regarding the fingers that are NOT playing or typing. In slide A) the fingers that aren’t playing are spread out in the opposite direction of the playing finger. In slide B) all the fingers are moving in the same direction. If the fingers are moving in different directions, this creates a co-contraction in the arm as the flexors (flex the fingers) and extensors (open the fingers) fight each other. Whenever two opposing muscle groups work against each other tension arises. In B) since the fingers are all moving together, there is less tension in the hand and arm. On a real piano, one with weighted keys, the keys are heavy enough to hold the other fingers on top of them (this doesn’t work so well with cheap keyboards because the keys are much too light). This way it’s easy to relax while playing and not ‘hovering’ over the keys. For people who type on keyboards, this is more difficult to do because the keys are so light. If you don’t hover the fingers that are typing may push down keys that you don’t want to be pushed. That said, it’s still possible with enough awareness.
♪♫
So, how did you do?? These are but a few examples of ways that you can learn to move optimally while typing and playing. I hope that you have learned something and I’m sending you a big thank you on behalf of your upper extremities!
